SS1 Product Unboxing Guide
How to install: SS1 Digital Thermo-Hygrometer Sensor
The following video will help you install the SS1 Thermometer Hygrometer
Installation and Setup
Step 1. Check that all items are complete
Before opening the package, check the integrity of the labels and seals on the package to ensure that you have not received a damaged product.
Open the package and please check the contents list to make sure you have received all necessary accessories. If there are any items are missing or damaged, please contact us(https://mocreo.com/service) .
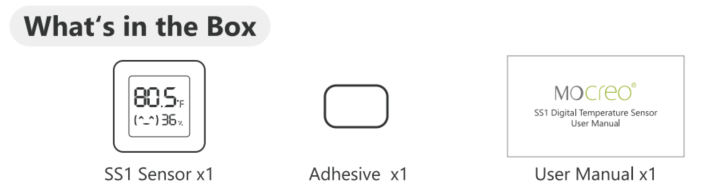
Before starting the installation, check the contents list to make sure you have received all necessary accessories. Please contact us(https://mocreo.com/service) if any items are missing or damaged.
Step 2. Download the MOCREO App and register an account
Search “MOCREO Sensor” on Google Play/App Store or scan the QR code below to download the MOCREO Sensor App.

Open MOCREO App and click “Create Account” to register a new account, please pay attention to entering the correct email format and password format.
If you have not received the confirmation email in your email, please click to check for troubleshooting.
Step 3. Add the MOCREO Hub
Before adding and using a MOCREO device, you need to make sure that you have granted the necessary permissions to the MOCREO Sensor App, which can be found by clicking on Permissions .
Open the MOCREO App and log in to your newly registered account.
We recommend utilizing an Ethernet connection to link the Hub to the Local Area LAN for optimal performance.
Ethernet connectivity presents distinct advantages over Wi-Fi:
The pairing method is more convenient
More stable connection
Configure MOCREO Hub via Ethernet:
* ● During the Ethernet configuration of the Hub, please make sure that the network of the mobile device is on the same LAN as the network to which the Hub will be connected.
* Prepare an Ethernet cable for plugging into the Hub’s LAN port.
* Before plugging in the Hub power cord, you will need to plug an Ethernet cable into the Hub’s LAN port.
Check whether the Hub is powered on successfully (The Indicator Light is on to indicate successful power-on).
Enter the main page, click “+” in the upper right corner of the main page, enter the “Select Device” interface, select “Hub”, and in the Hub interface, select the corresponding model of Hub according to the characteristics of the picture to add.
Choose “Connect to Ethernet”.
Press and hold the setting button on the Hub for 5 seconds until the Hub indicator light turns blue.
Wait for 5~10 seconds, please select the Hub you want to add on the page, and click “Connect”. If the connection is successful, it will jump to the page where the Hub has been successfully connected.
* For other errors, please click here to view for troubleshooting methods.
Configure MOCREO Hub via Wi-Fi:
* Ensure that the AP that the Hub is going to connect to is a 2.4 GHz Wi-Fi network.
* If you use a dual-band router, please turn off the dual-band unified mode and make sure the 2.4GHz Wi-Fi is turned on.
* Please keep your phone as close as possible to the Hub for connection, and ensure that the Hub is near the AP.
First, power on the Hub to ensure that the Hub is powered normally(The status light is on to indicate successful power-on.).
Enter the main page, click “+” in the upper right corner of the main page, enter the “Select Device” interface, select “Hub”, and in the Hub interface, select the corresponding model of Hub according to the characteristics of the picture to add.
Select “Connect to Wi-Fi.”
Press and hold the setting button on the Hub for 5 seconds until the Hub indicator light turns blue.
Select the Wi-Fi SSID you want to connect to, and then enter the Wi-Fi password. When “Congratulations! Hub setting successful!” appears on the page, it means that the Hub has been added successfully.
* After completing the process of adding the Hub, kindly follow the path (Menu >>> Hubs >>> Enter the Hub settings page >>> Verify in the “Firmware Version” field if the current firmware version of the Hub is v1.9.8. If it is not, please click on “Check Update” to verify and upgrade the Hub firmware version, ensuring that subsequent SS1 can be seamlessly added and utilized.
* Regarding the errors encountered during the process of adding the Hub, please click to view for troubleshooting methods.
Step 4. Add SS1 Sensor
Tap the [+] Button on the upper right of the MOCREO Home Page and select ‘Temperature & Humidity Sensor’,after entering the “Temperature & Humidity Sensor” interface, select “Climate Sensor - SS1” to add.
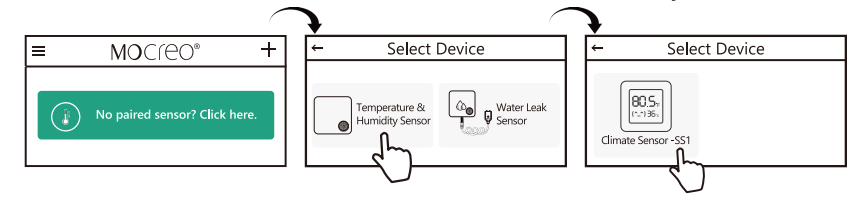
Select the Sensor you want to add and click on the “Add Devices” (Up to10 Sensors can be added at a time). Then set the standard (°C/°F) for your SS1 for the temperature you want to measure and complete the SS1 add process.
Device placement considerations and suggestions for enhancing connection stability:
To ensure stable communication between the Hub and each Sensor, it is recommended to install the Hub in the central location of the area where the Sensors are located. It should be mounted as high as possible, with the Hub antenna positioned upright.
The accuracy of Sensor signal values can be determined by checking the Last update time in the sensor card. We recommend that the signal value of the Sensor should be above 20% to establish a good connection between the Sensor and the Hub.
During the deployment of the Hub and Sensors, it is advisable to avoid signal interference sources or obstacles in the deployment environment.
Typically, the communication distance between the Hub and Sensors can reach 65.6ft-82ft (20m-25m), depending on the actual deployment environment.
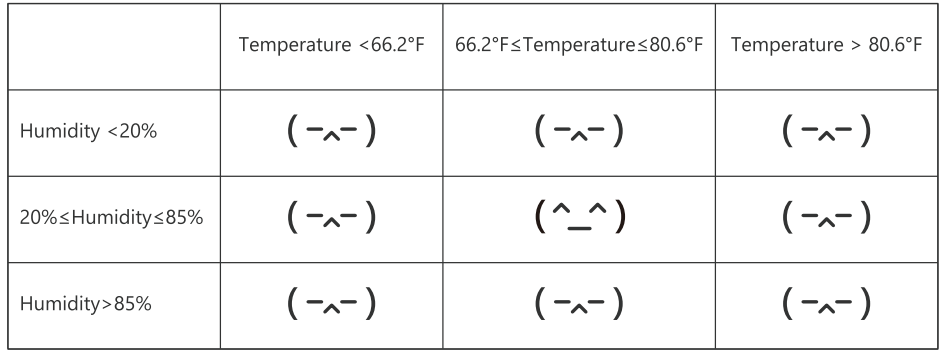
SS1 Comfort LevelIndicator Description
Installation instructions for other products
ST3 Thermo-Hygrometer Sensors 、 ST4 Temperature Sensors 、 ST5 Temperature Sensors 、 ST6 Thermo-Hygrometer Sensors 、 ST9 Thermo-Hygrometer Sensors 、 ST10 Temperature Sensors 、 SW2 Water Leak Sensors