MS2 Product Unboxing Guide
How to install: MS2 Temperature Sensor
Introduction
Meet Your MS2 Sensor. The MS2 monitors your fridge or freezer 24/7. It works with a MOCREO Hub to send live temperature updates and instant phone alerts, helping you protect your food from spoiling.
Why You’ll Love It
Peace of Mind: Get notified immediately if temperatures drift outside your safe range.
“Invisible” Cable: The 0.9 mm flat cable slides through your door seal without leaking cold air.
No Tools Needed: Simply stick the sensor to the outside of your fridge using the built-in magnet.
What’s in the Box
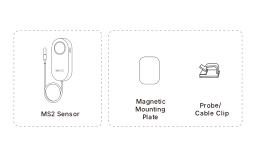
MS2 Sensor × 1
Magnetic Mounting Plate × 1
Probe/Cable Clip × 2
User Manual × 1
Product Parameter
Vent Holes
Setup/Test Button
Sensor Status LED
Temperature Probe
Lanyard Hole
Product Label
Setup QR Code
Magnetic Mount
Specifications
Model |
MS2 |
Wireless Connection |
Bluetooth (BLE) |
Communication Range |
230 ft (70 m) Line-of-Sight |
Dimensions |
3.7 × 1.7 × 0.7 in (93.5 × 43 × 17.5 mm) |
Weight (Including Probe) |
3.17 oz (90 g) |
Battery |
3 × AAA Batteries (Replaceable) |
Cable Length |
4.9 ft (1.5 m) |
Cable Cross Section |
0.12 × 0.04 in (3 × 0.9 mm) |
Probe Measuring Range |
-40°F to 158°F (-40°C to 70°C) |
Temperature Accuracy |
±0.9°F (±0.5°C) |
Mounting
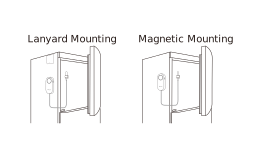
The MS2 Sensor supports the following mounting methods:
Lanyard Mounting — A lanyard is not included and should be purchased separately from a third-party supplier.
Magnetic Mounting — Use the built-in magnet / magnetic mounting plate to stick the sensor to the outside of your fridge.
Deployment Considerations
The MS2 wireless temperature sensor is designed for low-temperature environments such as refrigerators and freezers. Follow these recommendations when deploying it:
In low-temperature environments: Keep the MS2 Sensor body outside the refrigerator or freezer when possible, and place only the external temperature probe inside. The flat probe cable can pass through the door seal with minimal impact on the seal.
Probe placement: Leave sufficient space between the external probe and stored items so that air can circulate and temperature remains evenly distributed. Avoid direct contact with stored items, fans, and freezer walls to reduce measurement interference.
Special environments: The stainless-steel probe and PVC cable are corrosion-resistant, but long-term exposure to harmful chemicals, salt water, grease, humidity, or high temperatures may still cause corrosion or aging.
Installation and Setup
Step 1. Download and open the MOCREO Smart App
Search “MOCREO Smart” on Google Play/App Store or scan the QR code below to download the MOCREO Smart App.

Open the MOCREO Smart App and click “Create Account” to register a new account. Please pay attention to entering the correct email format and password format.
If you have not received the confirmation email in your inbox, please click to check for troubleshooting.
Step 2. Power on your MOCREO Hub and add it in the app
The MS2 Sensor cannot operate independently. Please complete the Hub setup process before adding the Sensor.
For detailed Hub setup instructions (via Ethernet or Wi-Fi), please refer to the Hub Unboxing Guide.
Step 3. Pull out the battery tab on the MS2 sensor
Pull out the battery insulating tab to power on the MS2 sensor.
Step 4. Add the MS2 Sensor
Open the app, tap “+” and select MS2 Sensor.
Scan the QR Code on the product label to add the sensor.
You need to place the Sensor near the Hub as well as the mobile device to ensure that the Sensor can be added successfully.
Test the Effective Distance
Place the paired MS2 Sensor in the location you want to monitor. Its communication range is up to 230 ft (70 m) line-of-sight, but walls, metal refrigerator bodies, and other obstacles may reduce the actual range.
Press the MS2 Sensor Setup/Test button once. In the MOCREO Smart App, check whether the “Last updated” time on the Sensor card changes to the current time.
If the time updates, open the Sensor configuration page and check the current signal level. If the signal is weak, adjust the deployment position of the Hub or Sensor.
Precautions for Use
To ensure the normal use of the product, please pay attention to the following situations:
It is recommended to install the Hub in a high place.
Do not expose the Device to high temperatures, humidity, or dusty environments.
Do not place the Device near flammable materials.
Do not put heavy objects on the Device or use it as a support.
Children should not use the Device without adult supervision.
Disclaimer
The contents about how to use the product and the App guidance are only for reference; please refer to the actual situation for specific applications. If there is something different from the instructions during using the product, please contact MOCREO Support for updates.
This product is for detecting and monitoring only. MOCREO is not responsible for any property damage or other consequences of the use of this product.
Warranty
MOCREO products enjoy a 12-month limited warranty (starting from the date when the customer receives the product), which applies only to hardware components of the device that are not subject to accident, misuse, neglect, fire, or other external causes, alterations, or repair.
FCC Statement
FCC ID (MS2 Sensor): 2BFZL-LS1
This device complies with part 15 of the FCC Rules. Operation is subject to the following two conditions:
This device may not cause harmful interference.
This device must accept any interference received, including interference that may cause undesired operation.
Customer Service
+1 (530) 988-8608
Search [ MOCREO ] on YouTube to watch the setup video tutorials.
Installation instructions for other products
MS1 Temperature Sensor 、 SS1 Digital Thermo-Hygrometer Sensor 、 ST3 Thermo-Hygrometer Sensors 、 ST4 Temperature Sensors 、 ST5 Temperature Sensors 、 ST6 Thermo-Hygrometer Sensors 、 ST9 Thermo-Hygrometer Sensors 、 ST10 Temperature Sensors 、 SW2 Water Leak Sensors